How to create Gantt Chart in MS Project
The conventional method to create a Gantt chart in MS Project is to fill in the task names, dates and resources in the work plan (chart) section. The Gantt chart will automatically be created accordingly, but like any Microsoft product, the chart can be customized.

Steps In Creating A Gantt Chart
1. Open a new MPP file
2. Save the file as (Shortcut = F12)
3. Insert the summary tasks, tasks and milestones of the work plan
4. Set the predecessors and duration of each task
5. Allocate resources for each task
6. The basic Gantt chart will then be created on the right side of the view
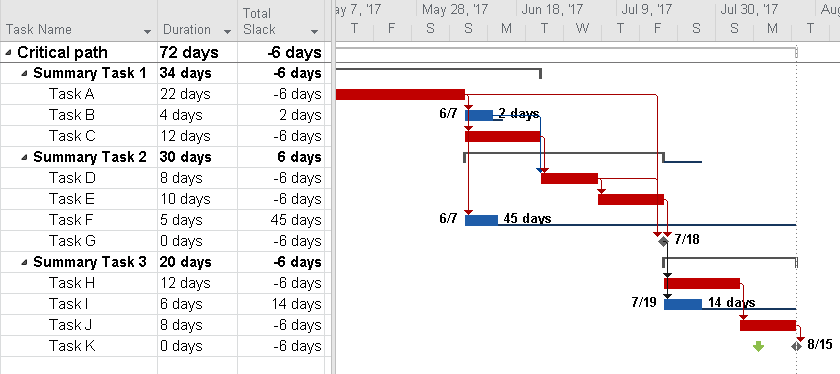
In order to add the “Project Summary Task” (row zero): Go to the “Format” ribbon, and check the “Project Summary Task” box. Unless changed, the name that will appear in the “Task Name” of row zero will be the name given to the MPP file. In the picture above, the gray bar at the top represents the entire span of the project, the black bars are the span of the summary tasks, the blue bars are the tasks and the gray rhombuses represent the milestones. On the right side of the blue bars are the resources allocated to the task, and on the right side of the rhombuses are end dates of the milestones. The summary tasks don’t have any information next to them.
Customizing The Gantt Chart
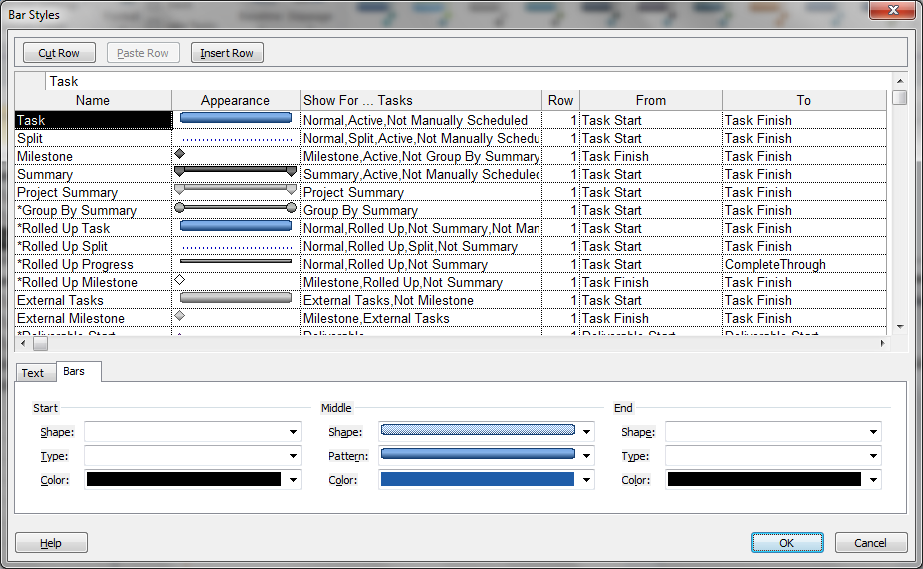
In order to see the critical tasks, check the “Critical Tasks” box. Critical task = a task that its slack is zero days, and delaying it by X days will delay the entire project by X days. The critical tasks bars will appear in red. In order to customize the appearance of the Gantt chart: click on “Format”. You can choose between customizing the entire Gantt chart by clicking on “Bar Styles”, or just one bar by clicking on “Bar”.

- “Name”: The name given to the group of characters which appear in the chart.
- “Appearance”: How the objects (bar/milestone/etc.) will appear on the Gantt chart. The bottom half of the menu is where the user can change the appearance (in the “Bars” tab). It is possible to alter the start, finish and middle of each shape in regards to the shape itself, pattern and color.
- “Show for…Tasks”: This is the filter of the Gantt chart. Here the user can set the parameters of which objects will appear.
- “From”: Where the object will start to appear on the timeline. This is a drop-down menu of all the columns that exist in the MPP file. “To”: Where the object will stop appearing on the timeline. This is a drop-down menu of all the columns that exist in the MPP file.
In the bottom half of the menu, in the “Text” tab the user can choose which text will appear next to the object. For example for the “Task” row it is possible to decide that the start date will appear on the left, the end date on the right and the task name on top. All of the parameters are drop-down menus.
Customizing The Gantt Chart Layout
If the user will click on “Layout” in the format ribbon on the top, the following menu will appear –
Also if the “always roll up Gantt bars” is checked, then all the summary tasks will present the individual tasks that are under them. There are 3 other check boxes –
1. “Round bars to whole days”: If the user checks this box, then partial days duration will be rounded in the chart.
2. “Show bar splits”: If the user checks this box, then if a bar is split in 2 or more parts the split will appear in the Gantt chart.
3. “Show drawings”: In the “format->Drawing” section the user can add drawings of shapes. Checking this box will allow them to appear on the Gantt chart.
Adjusting The Gantt Chart Timescale
There are 2 ways to change the timescale of the chart –
Use the standard “Zoom in” “Zoom out” buttons that appear on the bottom right of the chart (like all Microsoft’s application). The more precise method is to right-click at the top of the chart (in the header of the timescale), and choose “Timescale”. The following menu will appear –

In order to customize the timescale, the user needs to choose how many tiers are needed. This is done in the “Show” drop-down menu (one to three). The next step is deciding what the “Units” will be for each tier (from Minutes to Years), what the date format will be for each tier, the alignment and if the tick lines will appear. In the “Count” drop-down menu the user can choose if each unit will appear, or will only every second, third, etc. For example if the user chooses “Month” as a unit and “2” as the count, then only every other Month will appear in the header (January, March, May…).
This process needs to be done for each tier individually, using the tabs at the top of the menu. Please note that the tier units must be less than the units of the tier above. For example the user can’t choose “Months” for the Middle tier, and “Quarters” for the Bottom tier.
Critical Path In MS Project Gantt Chart
The critical path of a work plan is made up of tasks that together determine the overall duration of a project. Each task that is a part of the critical path has zero slack, and this means that a delay of X days in any one of these tasks will result in a delay of X days in the entire project. These tasks are called critical tasks, and deserve special attention due to their impact on the entire projects’ duration.

Using the “Total Slack” column in MSP, it is easy to see which tasks have available slack. These tasks should be delayed first if possible, and thus not delay the entire project. The “Total Slack” column should also be used when determining if any resources can be re-routed to a critical task.
The projects’ buffer should be calculated as X% of the critical paths’ duration. The percentage should change according to the following criterion –
- Complexity of the project: he more complex and innovative the project, the higher the percentage should be.
- Overall duration: the longer the project, the more than can (and usually will) go wrong. Hence the percentage should rise with the duration.
- Number of people involved: the more people that are involved, the higher the percentage should be.
The agreed upon buffer needs to be tracked & managed, and ideally the percentage of it that is used should be equal or less than the percentage complete of the entire project.
Negative slack is also possible, if a deadline was used in the project. If a deadline is set to 05-May for example, and the end date is 08-May, the slack for the task that is late by 3 days will show -3 (minus three) in the slack column.
How To Create Critical Path In MS Project
Luckily for us, MSP automatically calculates the slack of each task, and if asked will also color the critical tasks red in the Gantt chart. Simply go to the “Format” ribbon, and check the “Critical Tasks” checkbox.
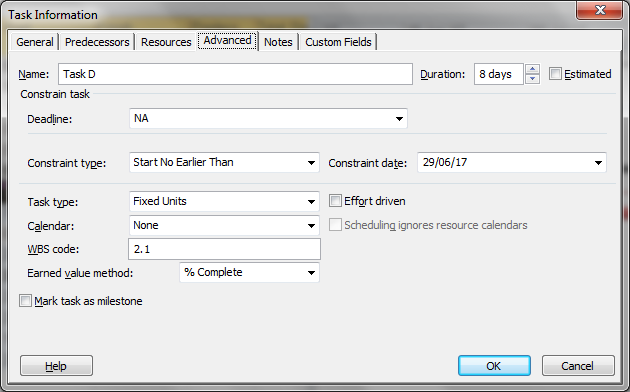
MSP will also determine the critical path, as long as the user doesn’t use any constraints. A constraint is a hard date that is set as a start / finish date for a task. The constraint is effectively a break in the path, and is set when the user chooses a date in the “Start” or “Finish” columns. Due to this, It is recommended to use only predecessors and duration to set the start / finish dates, and not to choose a date in these columns.

There are 2 ways to see if there are any constraints in the MPP file –
- Add the “Indicators” column to the plan: If there is an icon of a calendar in a row, then that row has a constraint. Hovering over the icon will show which constraint was used.
- Choose any row. In the “Task” ribbon click on the “Information” button. Go to the “Advanced” tab. If in the “Constraint Type” drop-down menu anything besides “As Soon As Possible” appears, then there is a constraint on the row. Also a date will appear in the “Constraint Date” field. To open the “Information” menu, it is also possible to double-click on the row.
Once no constraints exist in the work plan, MSP will automatically determine the entire critical path. MSP will also display the available slack for the tasks that aren’t on the critical path. In order to use this feature, go to the “Format” ribbon, and check the “Slack” checkbox. Then in the Gantt chart, you will see black line from the end of the non-critical tasks to the end of their slack.


