Add Traffic Lights Indicators In 4 Simple Steps With Microsoft Project
MS Project Status Indicator
One of the challenges for me as a project manager is to get the attention of senior management and the project team when there is an issue. Using MS Project status indicator is the best project status indicators technique.

MS Project Status Indicator
I have tried using various techniques but I feel using traffic light indicators is an effective way of getting everyone's attention. Now we will see how you can use traffic lights with Microsoft Project 2013 (You may be interested in scheduling,tracking, and resource Management tutorial for Microsoft Project 2013).
There are four steps you need to follow to get the traffic light indicators working in Microsoft Project: add a custom column/field, add the lookup values, select the graphical indicators and finally use the traffic light column.
Note: I have used Microsoft Project 2013 in this example. This procedure should work with most of the latest versions of Microsoft Project.
Step 1: Adding A Custom Column Or Field
You can add a custom field by using the custom fields option under the project tab. After you have clicked the button you will see a window for custom fields.
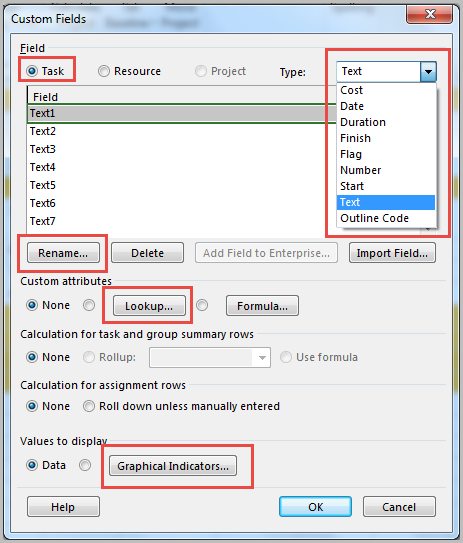
Select Task under Field, text in drop down for the type. Click on the Rename button and enter a field name of your choice. You can choose to enter status, traffic light etc. Please note the location of lookup and graphical buttons on the Custom Field Screen as we will be using it in the next step.
Tip: You can also add a custom field by right clicking on any existing column.
Step 2: Adding The Lookup Values
After you have finished Step 1 there are two configurations we need to do - first, set up the Lookup and second, Graphical Indicators.
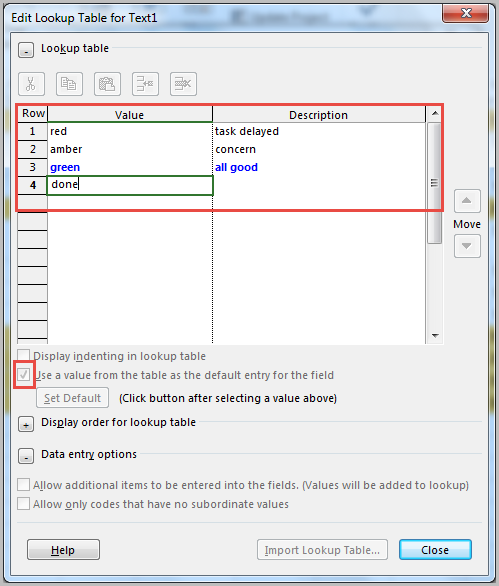
The lookup values will contain the different statues which we can have for the tasks. You can see the lookup dialog when you click on the lookup button. You have to enter value and description for each field.

Please note the field values as you will be using the values in the next section where we will add graphical indicators.
If you need a default value then please check the Use a value from the table as the default entry for this field. You can then set the default value from the list by pointing on the row and clicking the set default button.
Tip : Please remember to click on the lookup button before you select the radio button for custom attributes. If you try to check the radio button before entering the value then you will get an error message.
I generally use the below 4 statuses but you can use any status that suits your project. For an example of RAG status template to track business project.
| Status | Description |
|---|---|
| red | Means the task is delayed and needs immediate attention. |
| amber | The task is a concern and could be delayed. |
| green | The task is on track to complete on time. |
| done | Indicates the task is done and ready for next phase. |
Step 3: Select The Graphical Indicators
Click on the graphical indicators button in the custom fields dialog. You should see the screen on the right. You can select the indicators at 3 levels - non-summary tasks, summary and project summary.
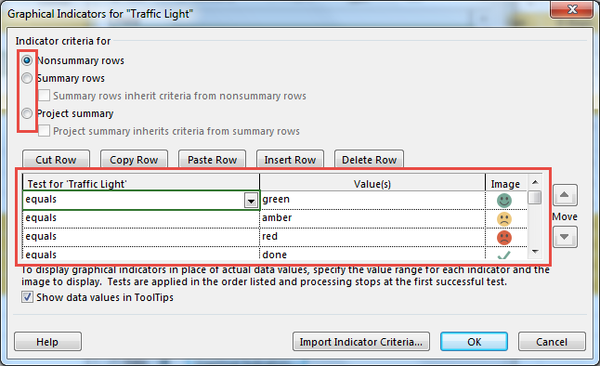
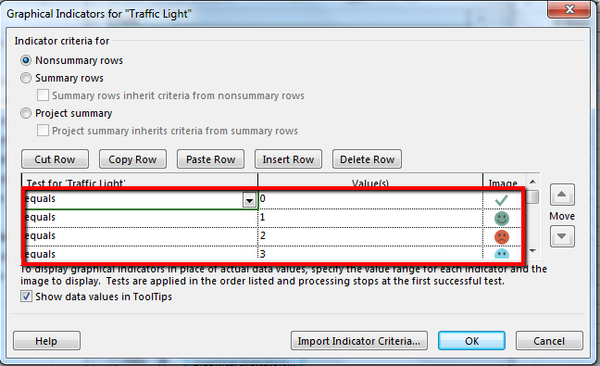
For this example, we will only look at the non-summary tasks which are the normal tasks. For each row you should select a test which is set against the value in the current field. For this example, I have used a simple test "equals" which checks the value in the field.
As we have set a lookup for this field we already know that the value will be red, green, amber or done. So, in the value section enter one of the statues. Please see the image "Graphical indicators" to see how you should be entering the values for all the rows.
Note: You can also use the formula in the test section to check a condition. Some people suggest using a % complete to arrive a red, green or amber. You can use any formula you wish, in the next section I will explain the rationale behind not having any formula to arrive at the red, green or amber status.
Step 4: Use The Traffic Lights Field
After setting up the field with lookup values and graphical indicators it is now time to use the traffic lights. You can add a custom field to your list of columns by clicking on any existing columns and then click Insert Column. After you click insert column you will get a list of column names. You have to then select "Traffic Light".
Also See :
I generally get the updates from the team and feed them into the plan. Then I manually check the progress and then select a red, amber or green status manually.
The simple reason why I select the status manually is to have control over the status displayed. You might have a task which is on track but could have a dependency or external risk which can delay it. If you want to use the automated option then please see the last section.
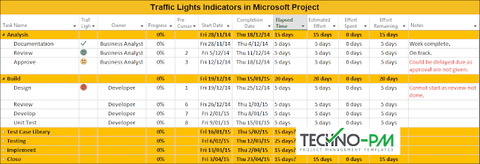
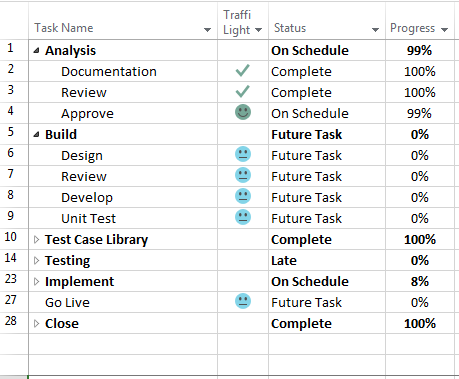
Traffic Light in MS Project
In cases where there are external factors I mark the status as a concern and put a comment to indicate the actual problem. Also, I like to use the done status when everything related to the task is really complete including peer reviews and checks. It's your choice on how you want to use the statues.
Use The Formula To Automate The Traffic Lights Field Calculation
I understand that if the project plan is too big then you might struggle to change the traffic lights manually for each task. There is a workaround to populate the image in the traffic light automatically which involves using the STATUS field. However, the solution that I am going to propose does not handle amber.
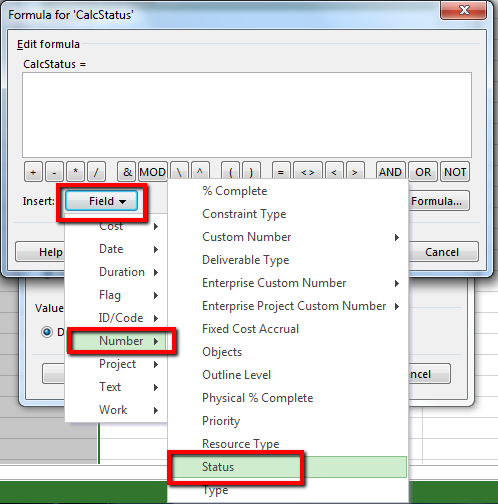
We will use the STATUS field to our calculation. Following is the mapping for values coming from the Status Field via the customer number field.
Value = 0 means Complete.
Value = 1 means On schedule.
Value = 2 means Late.
Value = 3 means Future Task.
Please create a custom NUMBER field as follows -
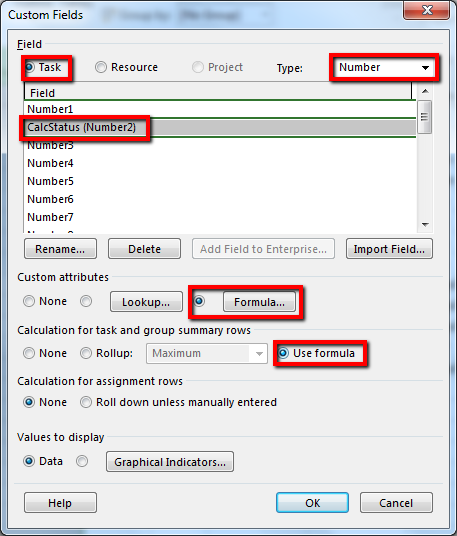
When finished selecting the above values please click on formula. After entering the details you can choose to hide the column.
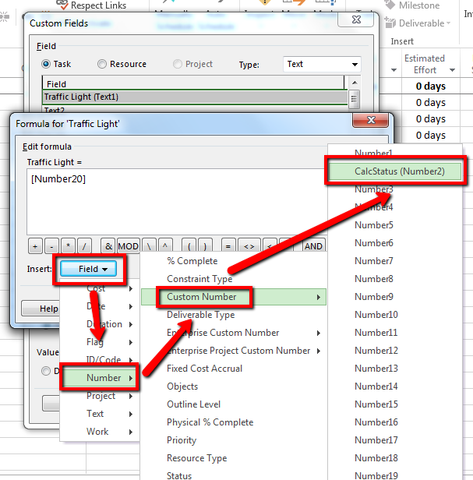
Click on the custom field you have created for showing the Traffic Lights and click on Formula button and make the changes as suggested below. Basically, you should select the custom field you mapped to Status and map it to the Traffic Light Indicator field.
After you have completed the above step you should update the Graphical Indicators by pressing the Graphical Indicators button.
Sample Project Plan with Automated Calculation Traffic Light Field.