8 Methods of Identifying Delayed Tasks In MS Project
Highlighting late tasks in MS project is very a basic and daily task for any project manager. Highlighting the tasks gets the attention of the required people easily. One of the first major tasks in project delivery is writing the projects’ work plan.

Late Tasks under View Tab
Option 1: Use The Built-In Highlight Late Tasks
This option is the easiest and most convenient. You can find the option to highlight under the View tab. The highlight features are very unforgiving. So, even if a task is 0.01 % behind, the task will be highlighted as late. The highlight feature allows you to highlight resources/tasks which meet certain criteria. Like Filters and Groups, MS Project has a few in-built highlight filters. The commonly used highlight filters are Late Tasks, Milestones, Critical Tasks etc. When you use a highlight filter the tasks which meet the criteria will be highlighted.

The late task is my personal favorite as it quickly shows where the progress is slow. You can create custom highlight depending on your needs. It is very similar to creating a filter. You can also change the color which is used to highlight the tasks (instructions at the end of the article). The highlight feature sometimes does not work when the project plan uses colors which are different to default colors. So, if you see use a plan which uses different background or text colors for asks then you may not be able to use the highlight late tasks filter. In order to avoid confusion its always better to let everyone know that MS Project highlight feature is based on automatic calculations and it is not you who is highlighting the tasks as delayed.

Project Plan before using the highlight

Project Plan after using the highlight
Option 2: Using The Customized Highlight In MS Project
MS-Project allows the users to automatically highlight the tasks which their Finish date is post their Baseline Finish dates. This requires a short simple customization, which will be explained in this paragraph. The highlight appears as a yellow one, allowing the user to see which tasks aren’t according to their baseline dates.
In order to customize the highlighting, go to the “View” ribbon and click on the drop-down list of the “Highlight”. Choose “New Highlight Filter…”. In the top field, choose the name of the highlight (for example “AvP”), and then fill in the following attributes –
- Leave the “And/Or” field empty
- In the “Field” column choose “Finish”
- In the “Test” column choose “is greater than” / “is greater than or equal to”
- In the “Value” column chose “Baseline Finish”
- Check the “show related summary rows” checkbox at the bottom
- Click “Save”
Now the “AvP” highlight filter will appear in the drop-down list, and each time that it will be chosen from the list, all the tasks which their “Finish” date is post their “Baseline Finish” will be highlighted in yellow. Note that the filter will need to be re-chosen if you made any changes to the finish dates and you want to see if any tasks are late post changes. This will help in tracking the tasks which are late and need more attention in order to mitigate. Please note that if the “% complete” is 100%, the row will still be highlighted, allowing noting the cause of the late successor tasks. There are a few default highlights which can be chosen, in addition to the customized ones.

Create a Highlight in MS Project

Custom Highlight MS Project
Option 3: Using A Custom Status Field
In order to be able to update the status of each task in the plan, a new column needs to be inserted into the plan and customized. The easiest way is to insert a “text” column (for example “text1”): Right click on the header of the column, and choose “Custom Fields” – It is also possible to add the column, and then go to: “Project -> Custom Fields” – In the menu, click on “Rename” and then give the new column a name such as “Task Status”. Next click on “Lookup” in the Custom attributes section of the menu.
Here you can enter the different values you would like to appear as possible choices in the drop-down list which will appear in each row. The user will be able to choose one of them for each task. The recommended values are: “Done”, “Not Started”, “Cancelled”, “Late”, and “On Schedule”. Of course, it is possible to add any other values you see fit.
In the right column of the values, it is possible to add a description of the value. For example: “Late” is if the end date is more than 3 workdays post the baseline finish date. After all the values and descriptions have been inserted, click on “Close” at the bottom right corner of the menu. The user of the work plan will now be able to update the status of each task in the work plan.
MS Project Custom Fields

Custom Field MS Project
Option 4: Show Slippage And Delay Using Baseline Feature
One of the default columns in MS-Project is the “Finish Variance” column, which calculates the difference between the “Baseline Finish” and the “Finish” dates in workdays (i.e. if the value is positive the task is late, and if it is negative it presents the total number of work days which the task is planned to finish before its planned finish date). For example: If a tasks’ baseline finish date is 18-Aug-2017, and the finish date is 14-Aug-2017 the finish variance will be “-4” work days. If the finish date will be changed to 22-Aug-2017 then the variance will be “2” work days.
In order to add the column, right-click on any of the headers of the plan and choose “Insert Column”. Then choose “Finish Variance” from the list. This column can be used to see how many days the task is late, and also can be used to see how many total days the entire plan is slipping past its due date. In order to see this, you need to add the Project Summary Task (row 0). In order to do this, go to the “Format” ribbon, and check the “Project Summary Task” checkbox. Now you will be able to see the variance of each task, and the entire project in row #0. Ig the highlight filter is activated, this row will be highlighted as well.
Slippage or Delay in MS Project
Option 5: Using Built-In Filters
Filters allow you to filter tasks or resources based on the criteria selected. When you use filters you will see only the tasks or resources which you have filtered. MS Project has some built-in filters which you can use straight away. Among all the filters my favorites are Late Tasks, Incomplete Tasks, and Critical Tasks. There is an auto filter option which will allow you to use basic filtering similar to MS Excel. You can clear any filters by clicking on Clear Filter option in the drop down.
You can also create custom filters to suit your requirements. You can create a custom filter by clicking on New Filter Option. When the option is clicked a new window will open up. Please select the values as per the instructions. If you want to see a list of resources for a given team then create a filter which will have a condition which checks the value of the Resource Group to be equal to the team name. The custom filter/group/highlight created will be available in the respective drop downs under the custom section.

Filters in MS Project

Creating Custom Filters in MS Project
Option 6: Using Groups - Built-In And Custom
Groups feature allows a grouped view of tasks or resources. Like Filters Groups also has some inbuilt group by options. You can use the existing group by straight away. Some commonly used by group by clauses are - Active Vs Inactive, Complete vs Incomplete, Group by Resource etc. Also if you click on "More Groups" in the group menu you will be able to see a lot more options for groups. Like filters', you can create a custom group either based on tasks or resources. Please remember depending on which view you are in - resources or tasks - the options you see in the groups drop down will vary. You can change the color of the highlight option in the Format tab.

Creating a new Group By

Groups in MS Project
Option 7: Using The Status Indicator Field
The status indicator field provides an alternate way of displaying the status. Right click on any column and insert the Status Indicator Field. The status indicator has three statues - This task is on Schedule, Task is behind Schedule and Complete. The good thing is that the field works for the summary tasks as well. The only drawback I see is that you cannot filter the tasks based on the statuses.

Status Indicator
Option 8: Using The Status Field
A status field is also an option. The status field can be inserted by right-clicking and selecting Status field. The Status field is a text field and has 4 statues. Future Task, On Schedule, Late and Complete. The status field allows you to filter based on the status. So, you can display just the statues that you want to see.

Status Field
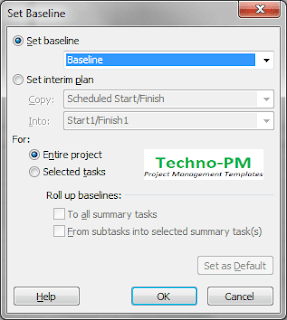
How To Set Up A Baseline In MS Project?
Once the work plan has been approved, the first step is to freeze the baseline (the Plan section in the AvP). In MS-Project this can be easily done using the “Set Baseline” feature: Project -> Set Baseline -> Set Baseline. In this menu choose the “Set Baseline” option button (this is the default), and in the drop-down list: chose “Baseline” (this is the default). In the “For”, section choose “Entire project” (this is the default), then click on “OK”. Now the dates will appear in the “Baseline Start” and the “Baseline Finish” columns, and they will be used as the plan dates for the AvP.